Google Analytics Cross-domain tracking allows you to see sessions on two or multiple sites as a single session, which is also called site linking.
This is really helpful when you use a separate site as the commerce site or shopping cart site. In that case, you can set up cross-domain tracking to track the customer journey from your website to your e-commerce order-taking platform and then back to your website.
Why should you use cross-domain tracking?
When visitors go to your website and find your product or service great, they click the Buy Now button. If the check-out page is in a separate domain, Google Analytics will actually assign a new clientID to the visitor, which means that you cannot track back to your website and know which page on your website generate more sales.
If you want to get a complete visit of the customer journey in Google Analytics, so you can better optimize your content for conversion rate, then you can need to change the Google Analytics tracking code to set up cross domain tracking.
How to change your Google Analytics code for cross-domain tracking
If you still use the classic code, then you need to update it to Universal tracking code. If you use Google Analytics tracking code, then you just need to replace a few lines on your own website and the separate e-commerce site.
You can follow the steps below to get it right.
- Change tracking code on your own website.
Find the “create” line in the snippet. Your Universal tracking code on your website should look like this:
<script>(function(i,s,o,g,r,a,m){i[‘GoogleAnalyticsObject’]=r;i[r]=i[r]||function(){
(i[r].q=i[r].q||[]).push(arguments)},i[r].l=1*new Date();a=s.createElement(o),
m=s.getElementsByTagName(o)[0];a.async=1;a.src=g;m.parentNode.insertBefore(a,m)
})(window,document,’script’,’https://www.google-analytics.com/analytics.js’,’ga’);
ga(‘create’, ‘UA-XXXXXXX-Y’, ‘yourdomain.com’);
ga(‘send’, ‘pageview’);
</script>
Replace the “create” line with the following:
ga(‘create’, ‘UA-XXXXXXX-Y’, ‘auto’, {‘allowLinker’: true});
ga(‘require’, ‘linker’);
ga(‘linker:autoLink’, [‘secondarydomain.com’]);
you need to replace the “secondarydomain.com” with your separate e-commerce site or shopping cart site. in addition, don’t forget to replace the example tracking ID (UA-XXXXXX-Y) with your own tracking ID.
- Change tracking code on another domain
Find and replace the “create” line in the snippet with the following:
ga(‘create’, ‘UA-XXXXXXX-Y’, ‘auto’, {‘allowLinker’: true});
ga(‘require’, ‘linker’);
ga(‘linker:autoLink’, [‘yourdomain.com’] );
Remember to replace the example tracking ID (UA-XXXXXX-Y) with your own tracking ID, and replace the yourdomain.com domain with your own website domain name.
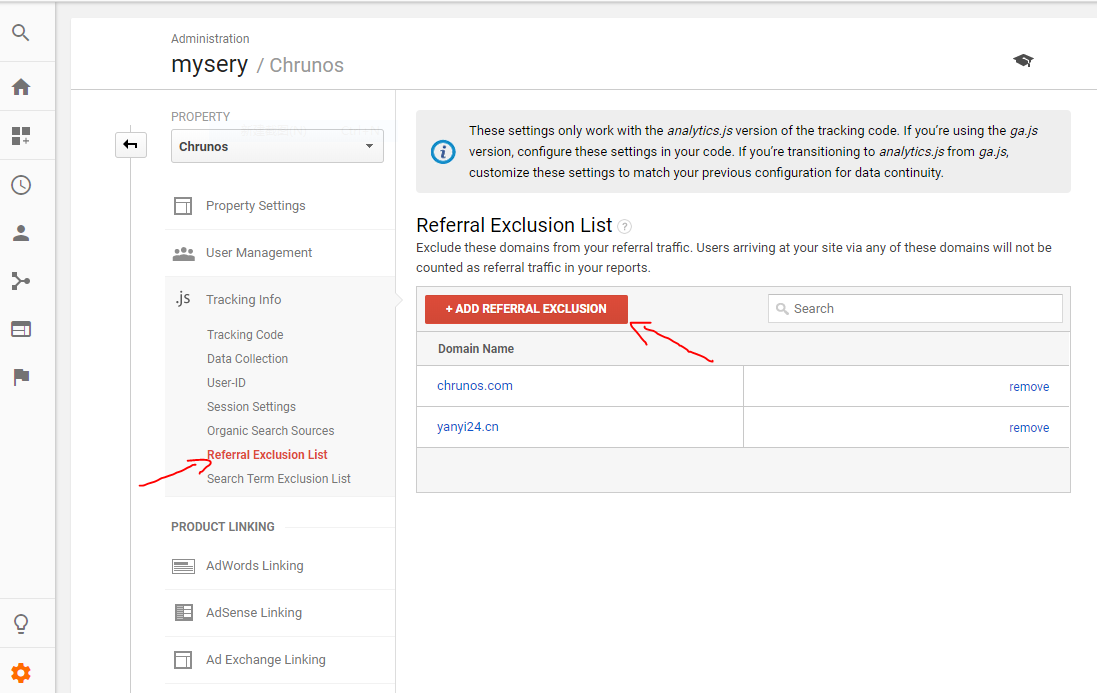
Add domains to the Referral Exclusion List
By default, when a visitor comes to the secondary domain form the primary domain, Analytics interprets that as a referral visit, and Analytics creates a new session. If you want to be able to track a single session across multiple domains, you need to add your domains to the referral exclusion list.
- In Google Analytics, click on Admin
- Select the Analytics account that contains the property you want to work with and select the Property.
- Click Tracking Info and select Referral Exclusion List.
- Click Add Referral Exclusion to add the domain name.
- Click Create to save the settings.
After that, the traffic from your e-commerce site will not be regarded as referral traffic and user journey crosses from your first domain to your second domain will be interpreted as a single session.
Let Google Analytics show domain name (optional)
As you know, reports in Google Analytics only show page path without a domain name. If these tracked domains have some same page paths, you might not be able to tell which domain each page belongs to.
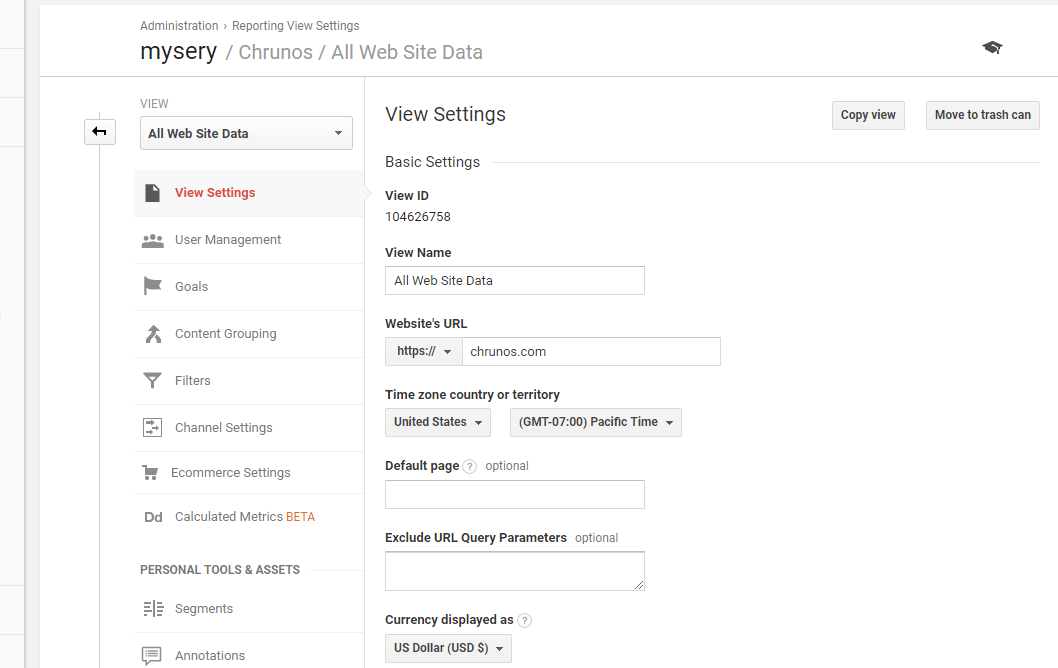
You may want to see the domain name in Google Analytics, you just need to set up an advanced filter. You probably do not want to mess up with the original report that without showing domain name, so it is recommended to create a copy of your reporting view that includes data from all your domains in it.
- Go to Admin and select View Settings under VIEW.
- Click Copy view.

- Change the view name if needed and then click Copy view.
- In the All VIEW column, select the new copy view that you just created.
- Select filters and + ADD FILTER.


- Enter a filter name as “show domain name” or something else.
- Enter the filter parameter as the following:
- Filter Type: Custom filter > Advanced
- Field A –> Extract A: Hostname = (.*)
- Field B –> Extract B: Request URI = (.*)
- Output To –> Constructor: Request URI = $A1$B1


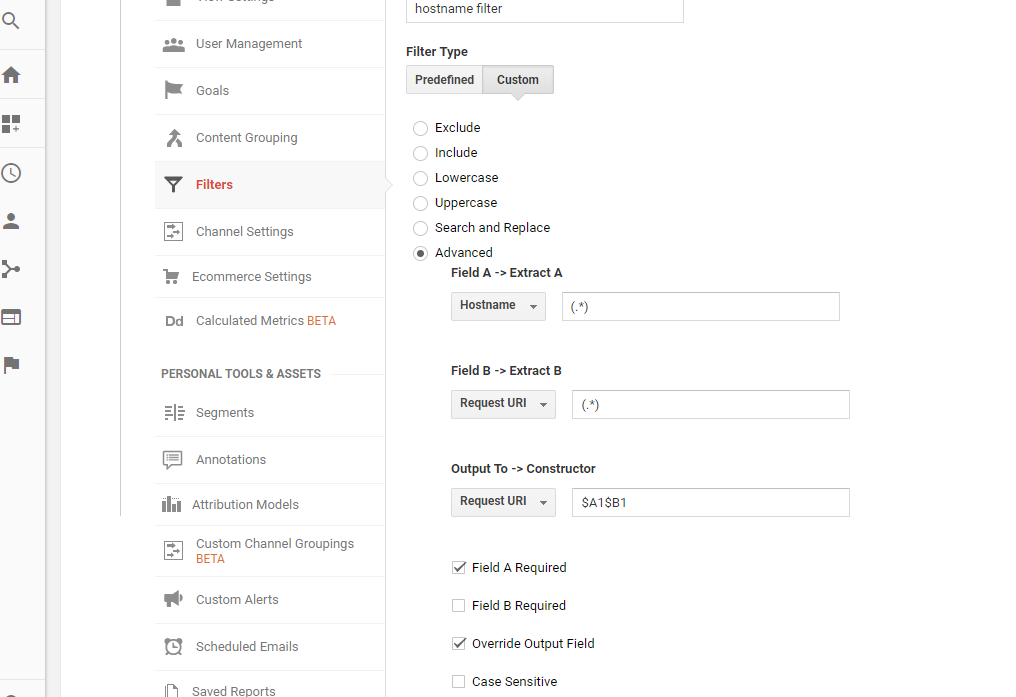
- Click Saveto create the filter.
Then go to Google Analytics report, you will see the domain name appear.
Check if cross-domain tracking works
To verify that the cross-domain tracking works, you can use a Chrome Extension GA Debug.
- After installing it, click on it to turn it on.
- Go to your own website, and right click and select Inspect.
- Under Console tab, find a ClientId.


- With the Developer Tools open, click on the secondary domain link on your website.
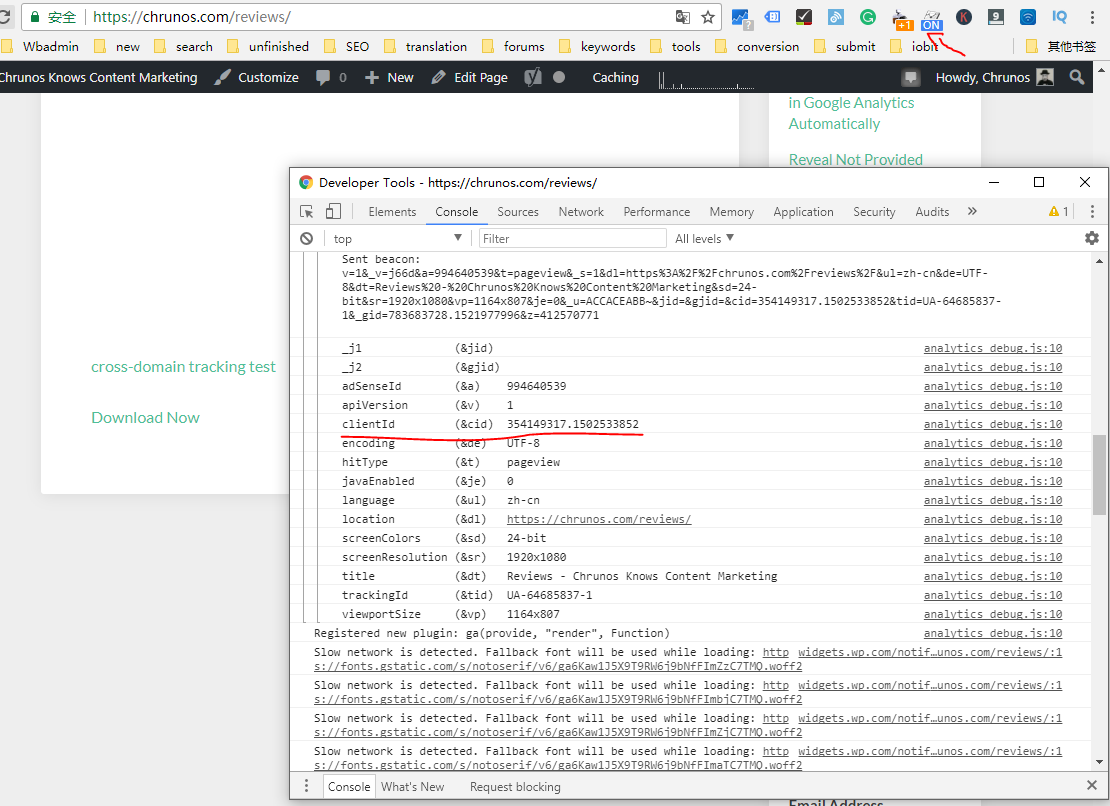
If the ClientId on your secondary domain does not change, then your Google Analytics cross-domain tracking is working.
If you do not familiar with code and do not want to mess up with Google Analytics tracking code, then you can also use Google Tag Manager to set up cross domain tracking.