You may have heard about the advantages of UEFI over Legacy, but you don’t know how to convert Legacy to UEFI mode. If that’s your case, you have come to the right place. In this article, I will show you how to do that step by step and you don’t need to reinstall your Windows.
UEFI is the replacement for BIOS
The Recent hardware uses a unified extensible firmware interface (UEFI) instead of traditional BIOS. UEFI is now on its way to replacing outdated BIOS, which is over 40 years old. Most of the UEFI computers have enabled Legacy boot mode to be compatible with old systems.
You can convert Legacy to UEFI mode to improve your PC’s performance. As you know Windows 11 requires UEFI boot, I highly recommend you switch to UEFI mode as long as your system and hardware support it.
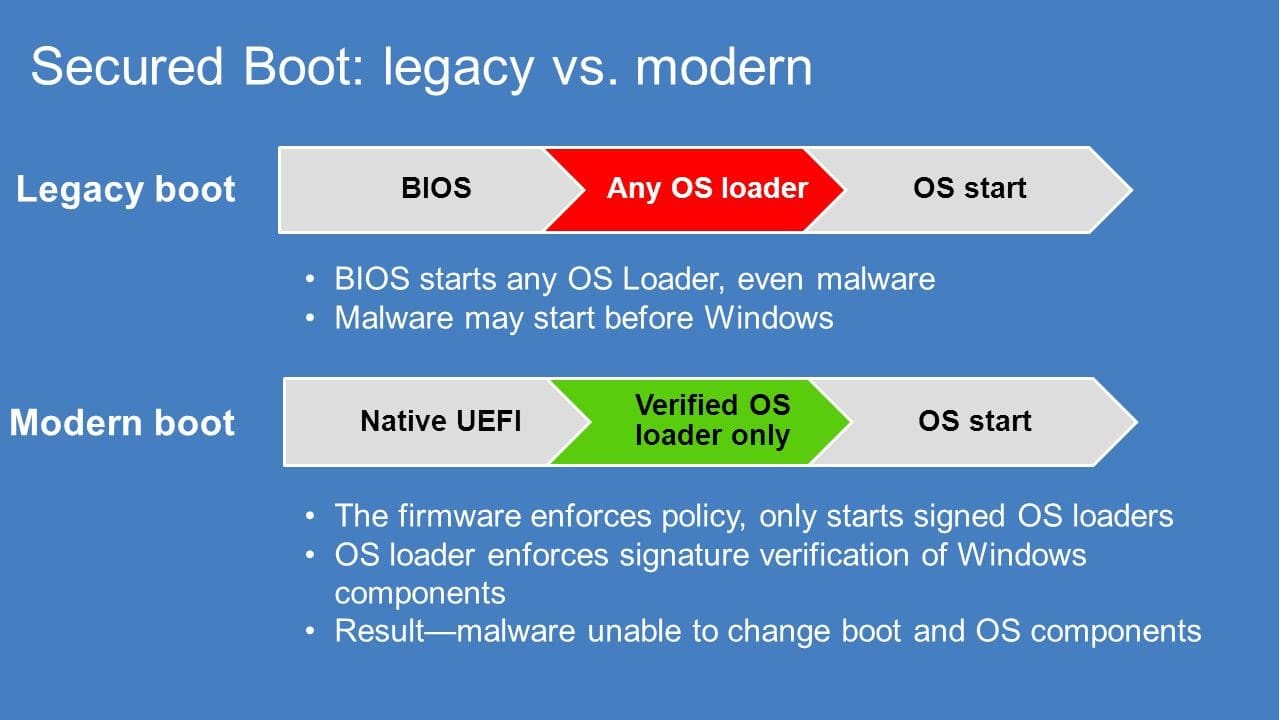
Image Source: https://www.youtube.com/watch?v=SRss3jY3cu0
Windows XP and Windows 7 32bit do not support UEFI. If you are using Windows 7 64-bit, Windows 8, or newer versions, you can change Legacy to UEFI mode without data loss if you follow this guide.
In Legacy mode, Windows can only boot from the master boot record (MBR) disk. MBR disks are limited to using 2TB of storage capacity and 4 primary partitions.
If you upgrade to UEFI mode which works with GUID partition table, then you can use disks of enormous size and create as many primary partitions as you want.
2 Different Approaches
As mentioned, since UEFI mode requires GPT disk, so when converting Legacy to UEFI, you need to convert MBR disk to GPT disk. Normally, you need to wipe the hard drive clean in order to convert your disk to GPT using Disk Management or DiskPart.exe.
That’s why people tell you you need to reinstall Windows to change to UEFI mode. Luckily, you don’t have to since there are a few ways to convert system disk from MBR to GPT for free.
Convert Legacy to UEFI without Data Loss
Actually, you don’t need to spend time installing Windows and programs. If you are using Windows 10/11, you can easily convert MBR to GPT without data loss from the command prompt. Keep reading to learn how.
If you are using older Windows OSes like Windows 8.1/7, there are other ways to convert MBR to GPT without data loss for free.
Before we proceed further, make sure your computer’s motherboard supports UEFI boot mode. If you can see UEFI mode in BIOS settings, your computer surely supports UEFI.
Step 1. Open an elevated command prompt. You can search for “CMD” and right click on the result Command Prompt and select Run as administrator.
Step 2. Type the following command and press Enter:
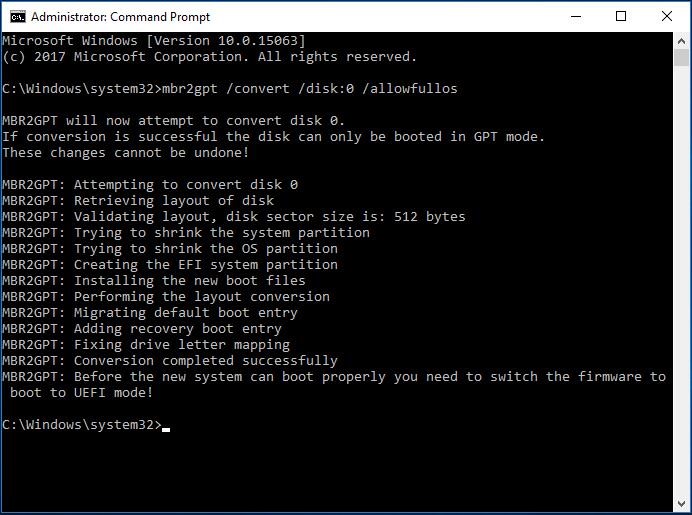
mbr2gpt.exe /convert /allowfullOS
If you have more than 1 hard drive installed on your PC, you need to add /disk: parameter to specify the system disk that you want to convert. For example, disk 0 is usually the system disk, so you just type “mbr2gpt /convert /disk:0 /allowfullOS”.
When the process is done, you can go to the BIOS of your PC to change Legacy to UEFI. From computers to computers, the steps to Enable UEFI mode are different. You can refer to the following to configure it. If you don’t like the command line experience or mbr2gpt is not an option, you can also use a third-party program with a GUI to convert MBR to GPT without data loss.
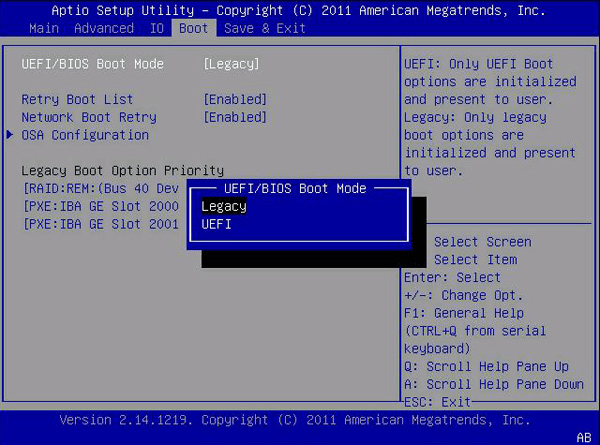
Step 3. Reboot your PC. When the motherboard logo appears, continuously press a specific key (F2 or Del) to enter BIOS configuration screen. If you have no idea which specific key to press for your PC, just press Esc repeatedly. It will give you the full menu, then you can select BIOS Setup option.
Step 4. Usually, you will find the Legacy/UEFI boot mode configuration under the Boot tab. On the older motherboard, you can choose either Legacy or UEFI. On the recent hardware, you can choose UEFI first, which means it supports UEFI and Legacy at the same time. Just don’t choose the Legacy Only option.
Step 5. Press F10 to save settings and then exit. Your system will reboot and now your computer is booting from UEFI mode and your data are intact.
Change Legacy to UEFI with a Clean Install
For a clean install, surely you need to prepare a Windows installation disk. You can simply download the Windows Media Tool to create a Windows installation USB drive or disc. After that, follow the steps below to convert system disk to GPT.
Step 1. Press the Del key repeatedly after you see the motherboard logo on startup. From BIOS, from there select to boot your computer from a Windows installation disk.
Step 2. Select the Language and keyboard as you normally would when installing Windows. At the Windows Setup screen, press Shift + F10 to open a command prompt.
Step 3. Type “diskpart” (without quotes) to open the Windows DiskPart tool. Then type “list disk” to list all the disks installed in the computer. Take a close look at the listed disk info, so you can know which disk you want to convert.
Step 4. Type “select disk [disk number]” to select the disk to clean. Please double-check to make sure you select the right disk because the next step will wipe all the data.
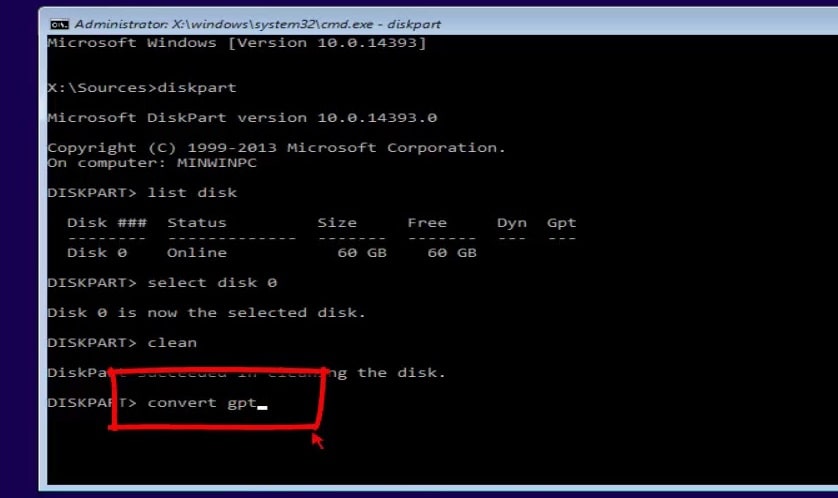
Step 5. Type “clean”.
Step 6. Type the command “convert gpt” to convert the disk from MBR to GPT.

Step 7. When you see the message “DiskpPart successfully converted the selected disk to GPT”, you can close this window and boot into BIOS to enable UEFI mode.
Some computers have both Legacy and UEFI mode enabled and set to UEFI mode first. In that case, you don’t have to change anything and system will automatically boot from GPT disk. All you need to do is to install Windows.
Final Thoughts
In conclusion, it is always a good move to convert Legacy to UEFI boot mode as long as your PC hardware and software support it. The only trick is to convert your hard drive from MBR to GPT.
You can do it with a clean install or without reinstalling Windows. If you have any problems doing any of the steps, let me know in the comments or send me an email. I’d be happy to help.
Roger B:
Are you serious? You cloned an MBR disk to a USB drive and you expected the USB drive to be bootable?
I am cloning an MBR disk to a usb drive. Then moving it to a new UEFI machine which only allows external legacy booting. I am trying to convert the USB drive to GPT with the MBR2GPT tool before cloning the USB drive to the target UEFI machine so it alredy has UEFI before starting it up on the mew hardware. I am having issues…what am I doing wrong. The machine fails to boot and goes to Dell Assistant screen.